Dr. Jart+

Daily Facial Cleansers

In previous posts, I’ve written about the importance of incorporating masks and peels into your beauty regime. However, before you can even indulge in these products, you must begin with a clean makeup-free face. Deciding on a daily cleaner and makeup remover can be a daunting task given the sheer volume of products in the market. So we’ve broken down our top cleaners based on affordability, ease of use and effectiveness.

Best Budget Cleanser and Makeup Remover:

Best “I Have No Budget” Cleanser and Makeup Remover:

Best Makeup Removing Wipes:
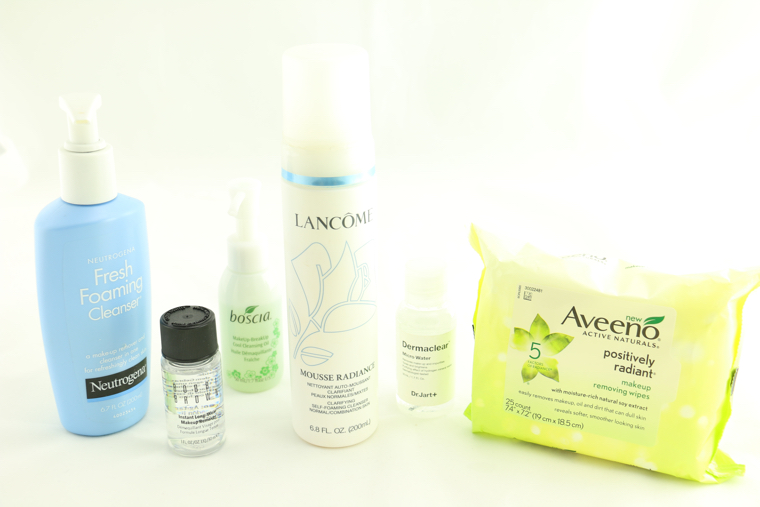
 Best Makeup Remover “After-Feel”

  • Jart+ Dermaclear Micro Water ($32): I want to express how amazing this product is. If you hate the feel of your face after using a makeup remover, then look no further because Dr. Jart’s Dermaclear Micro Water is it. This product feels and looks like water, just as it claims, and you only needs a few drops to remove makeup. The best part is that you don’t have to wash your face afterwards because the product is so light and also works like a toner. What confirmed the greatness of this remover? When I went to my local Sephora and asked for some makeup remover, guess what they handed me…yep Dr. Jart+ Dermaclear.


Until recently, I always equated masks to a skin drying, meant to scare your spouse and children at night kind of product. I simply didn’t understand the benefits or the importance of detoxifying my face. It wasn’t until I used two Dr. Jart+ masks, included in my Clarisonic Mia 3 K-Beauty Cleanse Set, that I discovered the powers of a really potent mask.

Everyday our skin is exposed to dangerous UV rays, pollutants, bacteria and other grime—not to mention the buildup caused by the application of daily makeup. While nothing can replace a good nightly cleaning, either with a wipe, cream, oil or foam-based cleanser, masks help target areas that need more TLC.

My Favorite Masks

  1. Jart+ Water Replenishment Cotton Sheet Mask ($7.50)

This super hydrating mask is perfect to use after a day at the beach because of its cooling effect. It also helps with diminishing redness and laugh lines while simultaneously brightening the skin. To get the most benefit, be sure to slather any remaining product over your neck and allow your skin to soak in all the goodness.

  1. Jart + Pore Minimalist Black Charcoal Sheet Mask ($35 for 5 single use masks)

Dr. Jart + Pore Minimalist Black Charcoal Sheet Mask really focuses on two goals: detoxification and pore tightening. So if you are in the market for a product that targets these issues, you’ve hit the jackpot with this particular face mask.

  • Front

    Front

  • Pages 1-2

    Pages 1-2

  • Pages 3-4

    Pages 3-4

  • Pages 5-6

    Pages 5-6

  • Pages 7-8

    Pages 7-8

Insider Tip

This past December, I purchased a limited edition of Dr. Jart+ Book of Masks ($39) which contained eight full-face and spot treatment masks. This prices each mask at $4.87 compared to its regular price of $7.50. That’s more than two dollars in savings per mask!! So be on the lookout for such steals during the next holiday season.

Reviewing My Very First Clarisonic Mia 3 K-Beauty Cleanse Set

I debated long and hard before I decided to finally take the plunge and purchase my very first Clarisonic.  I came to this decision after experiencing constant frustration with my skin’s complexion.  No matter what products I used, my skin remained flakey and dull.  So with my renewed vow to a better and healthier glow, I chose the Clarisonic Mia 3 K-Beauty Cleanse Set ($199).  While pricey, I gravitated towards this Clarisonic set because it offered me the ability to try out three Korean beauty brands that I had heard of but never tried. The Clarisonic Mia 3 K-Beauty Cleanse Set includes brands such as Boscia, Dr. Jart+, and AmorePacific.  I figured that using these products in conjunction with the Clarisonic Mia 3—a three-speed cleansing device—would give me the best results (the Clarisonic Mia 1 is one-speed while the Clarisonic Mia 2 supports 2 speeds).  Well, my gamble paid off and I am beyond pleased with my new radiant face. 

Within several weeks of use, my dry, patchy skin was becoming a thing of the past.  In conjunction with the Clarisonic Mia 3, I used the accompanying Boscia Makeup-Breakup Cool Cleansing Oil ($30 for full version) which worked amazingly well to remove all makeup residue and other impurities.  This new regimen left my face refreshed and luminous.  Another added bonus was that it left me with a better canvas in which to apply my foundation.  I instantly noticed my makeup application go on more smoothly and evenly.  Overall, I can’t say enough great things about the Clarisonic Mia 3 K-Beauty Cleanse Set.  

My Clarisonic Regimen:

  1. Remove all makeup.
  2. Dampen the Clarisonic brush head with warm water and place 1 to 2 pumps of the Boscia Makeup-Breakup Cool Cleansing Oil directly onto the brush head.  (Note: this Clarisonic set comes with a sensitive head brush.  Other brush types can be purchased according to your personal needs.  Clarisonic recommends replacing the brush head every three months).
  3. Begin by pressing the Clarisonic’s middle button, then gently holding and moving the brush along sections of your face.  This device does timed sections, so simply move to another part of your face with every beep.  I like to use the fastest speed for my nose and chin (bye bye blackheads!!).  I then lower the setting for the rest of my face.  
  4. Rinse off your face with warm water and apply your favorite night cream.  I use the CeraVe Facial Moisturizing Lotion PM ($13.99) because its non-comdogenic.  
  5. For best results, use a maximum of three times per week.  I found that using it more than that can cause breakouts.  On my off days, I follow through with either a Dr. Jart+ mask or Dr. Gross Skincare Alpha Beta Universal Daily Peel.    

Care and Cleaning:

Aside from changing the brush head as recommended, there are other steps that I take to ensure that my $200 investment lasts a long time.  

  1.  After every use, I rinse and clean the brush head against my palm in smooth circular motions.  This removes any excess makeup residue and prevents discoloration.  
  2. I then place the brush head on a clean flat towel to dry off.
  3. Next, I clean the inside of the Clarisonic with a Q-tip.  Grime and other gunk can accumulate if you don’t follow this step.  When finished, place it on the Clarisonic drying stand and let dry.  
  4. I would not recommend using or storing the device in the shower.  Keeping it dry helps keep it from becoming a breeding ground for grime.